 "Jcarr" (jcarr)
04/26/2015 at 15:46 • Filed to: Headlight restoration
 0
0
 16
16|
"Jcarr" (jcarr)
04/26/2015 at 15:46 • Filed to: Headlight restoration | 0
| 16 |
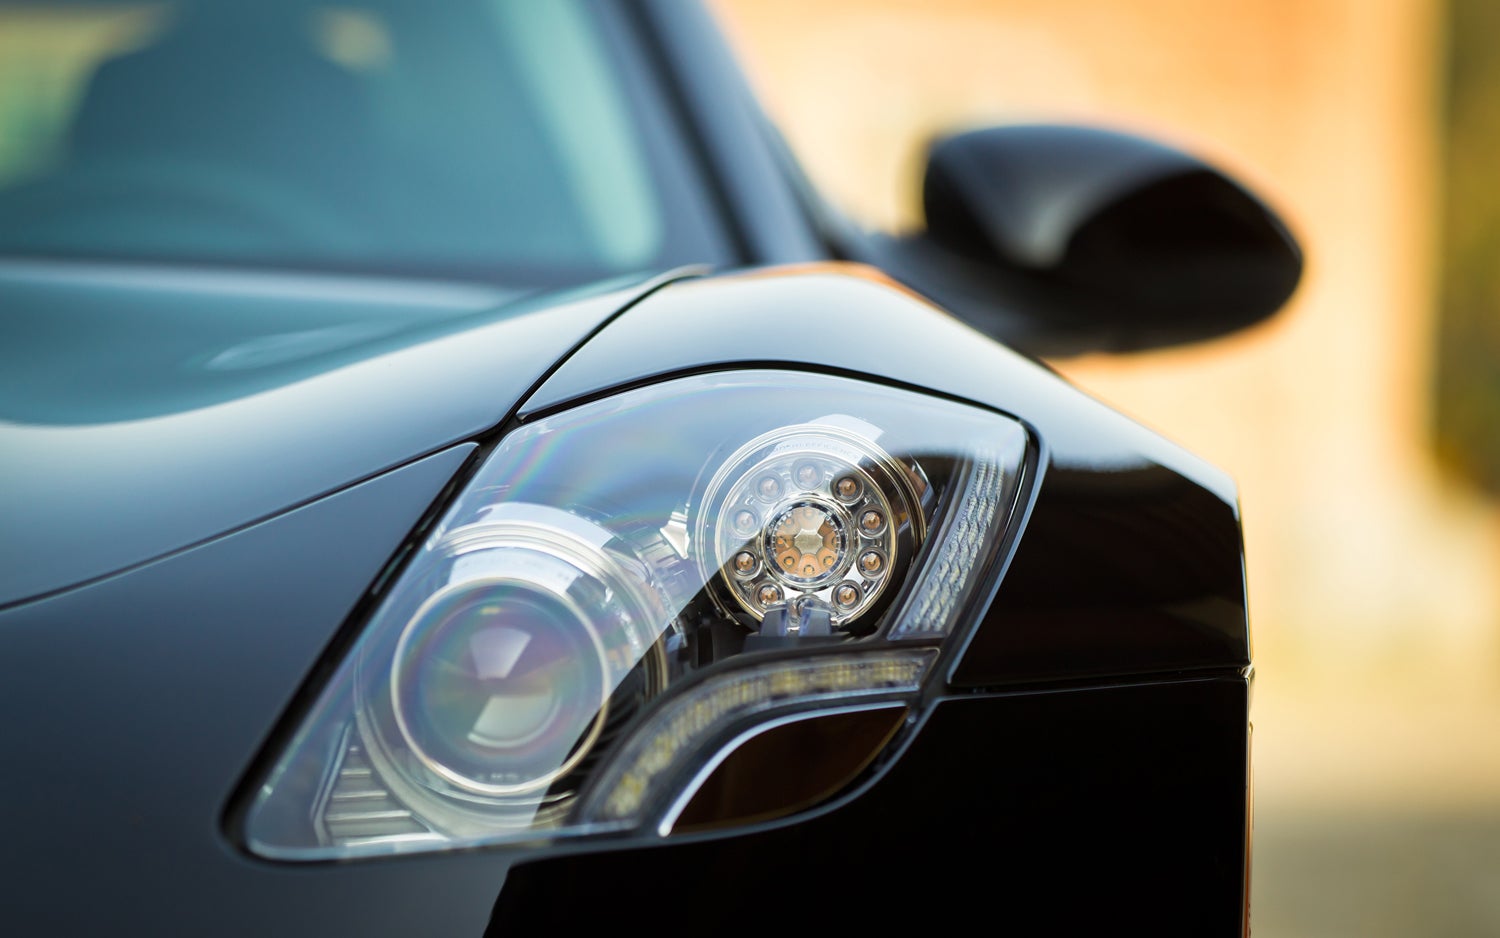
The Jetta’s lights are getting quite cloudy so I’m going to need to do something soon. I used a Meguire’s kit a few years ago and it did an OK job, but I’m open to suggestions.
Any advice?
Bonus points if you can identify this car by its headlight:
 anon-sxmcyecofnu1eocpqsk9iq
> Jcarr
anon-sxmcyecofnu1eocpqsk9iq
> Jcarr
04/26/2015 at 15:49 |
|
Fisker Karma? I got nothin’ for the cloudy headlights though.
|
Jcarr
> anon-sxmcyecofnu1eocpqsk9iq
04/26/2015 at 15:50 |
|
Yep, wish mine looked like that.
 sm70- why not Duesenberg?
> anon-sxmcyecofnu1eocpqsk9iq
sm70- why not Duesenberg?
> anon-sxmcyecofnu1eocpqsk9iq
04/26/2015 at 15:50 |
|
Shit, you’re right.
 ctmeche
> Jcarr
ctmeche
> Jcarr
04/26/2015 at 15:51 |
|
I used the 3M kit on my S2000 two years ago, and it’s still holding up. I bought the one without the add-on protectant, but it might be worth considering that version if your car sits in the sun a lot.
Just make sure you protect the paint surfaces near the headlight, as you don’t want to accidentally buzz them with the edge of the rotating pad. I used blue masking tape topped with duct tape, but maybe some food box cardboard or something else would work well, too.
 Arben72
> Jcarr
Arben72
> Jcarr
04/26/2015 at 15:52 |
|
Anything that involves sanding and not just the liquid polish. I used 3m’s kit with good results in the past.
 Twingo Tamer - About to descend into project car hell.
> Jcarr
Twingo Tamer - About to descend into project car hell.
> Jcarr
04/26/2015 at 16:00 |
|
There’s a really good 3M kit that I’ve seen people get good results with.
 Zipppy, Mazdurp builder, Probeski owner and former ricerboy
> Jcarr
Zipppy, Mazdurp builder, Probeski owner and former ricerboy
> Jcarr
04/26/2015 at 16:07 |
|
This explains it pretty well.
 Roadster Man
> Jcarr
Roadster Man
> Jcarr
04/26/2015 at 16:16 |
|
I always use the headlight cleaning compound by 3M. You need to be patient and follow the directions, but then just re-apply and do it over and over. Eventually it comes out really nice.
 Übel
> Jcarr
Übel
> Jcarr
04/26/2015 at 16:29 |
|
I’ve had good luck with the Turtle Wax kit, but with any of them the key is to be thorough and scrub the everloving fuck out of them headlights. If your car isn’t shaking, push harder.
 TheVancen- In Pursuit of a Greater Payday and Car Parts
> Jcarr
TheVancen- In Pursuit of a Greater Payday and Car Parts
> Jcarr
04/26/2015 at 17:08 |
|
I just sanded the ones on the focus a few years ago. Finer and finer grits, then cutting and buffing compound. I just treated it like paint actually.
And I’m gonna say Jag F Type.
|
TailLightDetective
> Jcarr
04/26/2015 at 17:12 |
|
No no no! I’m the TailLightDetective.
It’s really hard to find work in this tough economy.
 Yes I daily a Prius and I like it, hate me.
> Jcarr
Yes I daily a Prius and I like it, hate me.
> Jcarr
04/26/2015 at 17:23 |
|
It’s the 3m one and it’s great. You use a drill and attach sandpaper to actually remove the oxidized layer and then polish it. But be sure you mask off your bumper with good quality masking tape or else you will scratch it like it did :(. My cheapo masking tape was way too thin.
 boxrocket
> Jcarr
boxrocket
> Jcarr
04/26/2015 at 17:33 |
|
Buy these sandpapers: 1000 grit, 2000 grit, and 3000 grit. Get some clean, pure water or glass cleaner in a spray bottle. Get good masking tape and perhaps some cardboard. Tape off the headlights, perhaps using the cardboard to block off more of the body if you wish (I've made the mistake of only using a strip or two of wide masking tape and messing up my paint).
Starting with the spray bottle of water or glass cleaner, thoroughly wet-sand the surface of the headlamp with the 1000 grit. Rinse, then wipe. Repeat with the 2000 grit, and then the 3000. They should be significantly clearer.
You may opt afterwards to buff/polish them if you wish, or apply a protectant as mentioned in other comments.
Alternately you can use a dual-action sander and sanding pads if you want, but you'll spend a fair amount of money and only save a little time, and perhaps sacrifice some control.
IME this will be cheaper in the long run, and you'll have the sandpapers needed for future efforts.
 7:07
> Jcarr
7:07
> Jcarr
04/26/2015 at 20:15 |
|
Please use the one by Sylvania. It’s not cheap, but it’s the only one I’ve find that has a clearcoat stripper AND a UV protectant. It has sandpaper and the other supplies you need, but if you don’t add a UV clearcoat you’ll be doing this project again soon.
|
7:07
> 7:07
04/26/2015 at 20:18 |
|
 The Opponaut formerly known as MattP123
> Jcarr
The Opponaut formerly known as MattP123
> Jcarr
04/26/2015 at 21:25 |
|
Brasso
. Scroll to the bottom for my before/after.